
All audits that you run in the A11y Toolbox must be associated with a client property. Being able to reference a client property that is thoroughly fleshed out with the relevant information will allow you to make more specific references within an audit.
client properties that include all of the information you need allows you to make more specific references within an audit.
There are two types of properties that you can apply to an A11y Toolbox audit: domains and software.
Each type of property can be broken down into specific components that are necessary for creating an audit, like sitemaps, sample items, and screens. Below is a quick list to break down how they relate to each other.
Types of Client Properties:
- Domains
- Includes: Sitemaps, or
- Includes: Sample Items
- Software (desktop or mobile apps)
- Includes: Screens
This tutorial article will explain what properties, sitemaps and sample items are, why (and when) you should include them, and where you can locate them in the Toolbox.
Adding New Client Properties
If you are performing an audit for a client, the client property will be what you’re auditing. While a domain will obviously refer to the client’s website, software can refer to either a desktop app or a mobile app.
As a general rule to remember, properties are always associated with the client they belong to. You cannot access a property without first choosing a client.
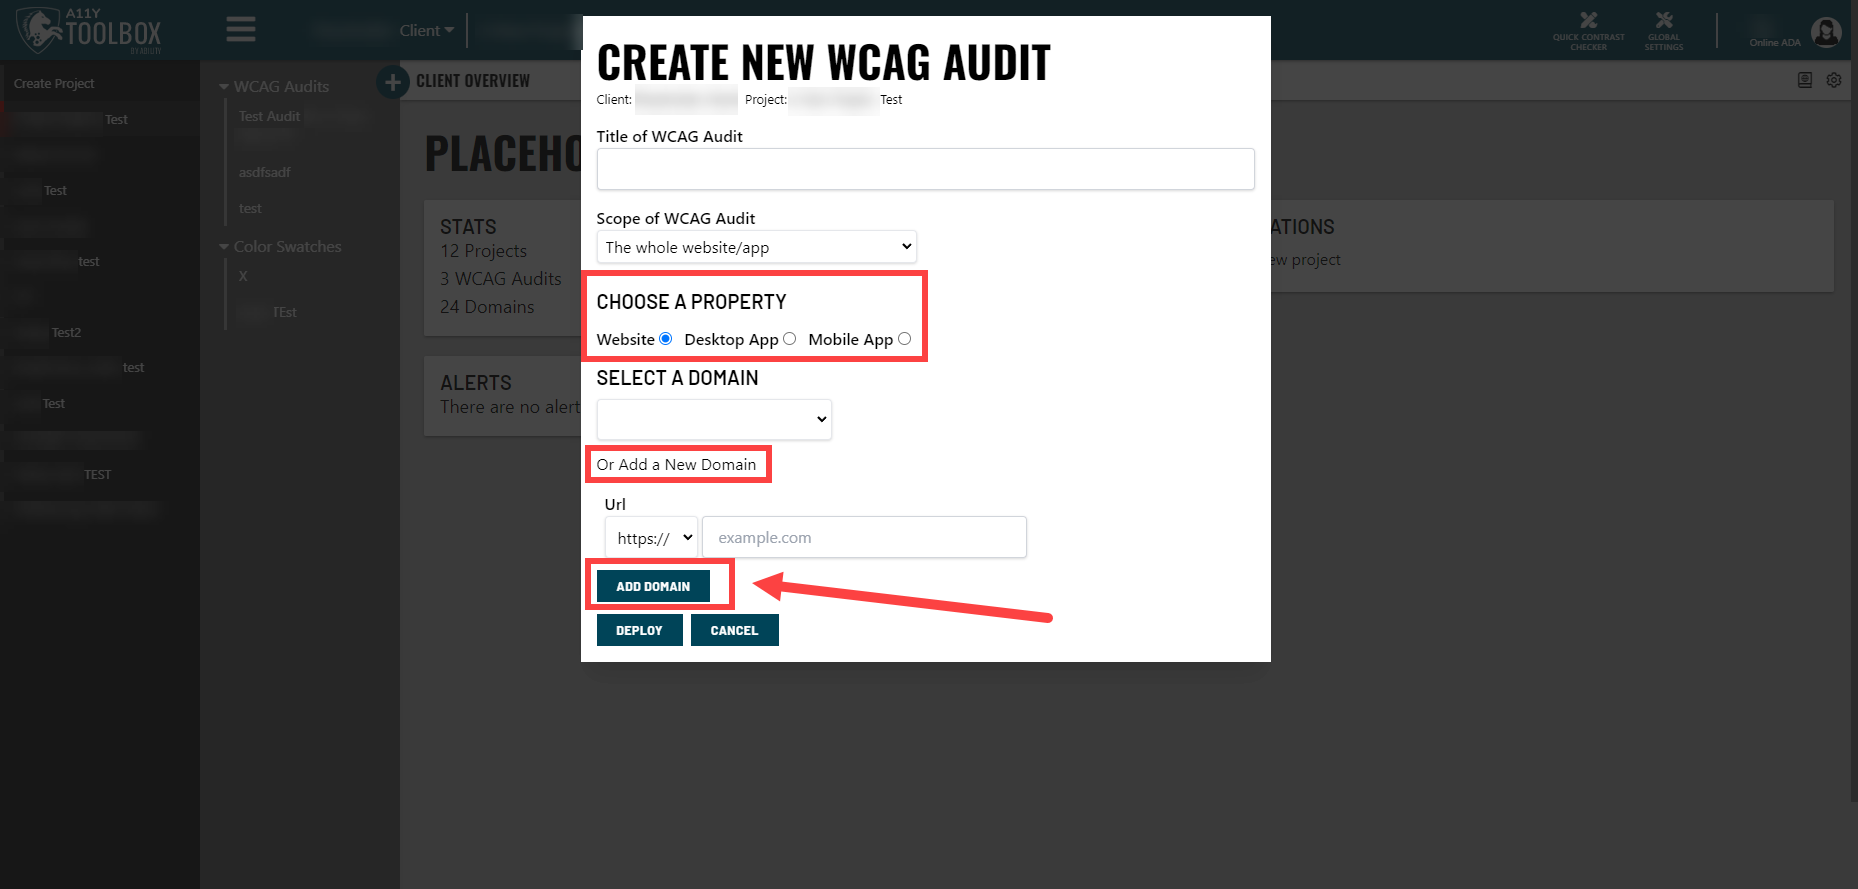
There is only one way to create new client properties: add one when you create a new audit in the Toolbox.
When you create a new audit, the “Create New WCAG/Media Audit” pop up window will appear. Under the Choose a Property section, you’ll be able to choose your property type: a website, a desktop app, or a mobile app. Underneath these options, you’ll see an “Add a New Domain” or “Add a New Software” button, depending on what type of property you’ve selected. Once you’ve entered your new property information, select the “Add Domain” or “Add Software” button. Your property will be added to the Toolbox and be associated with the active client.

Viewing/Editing Client Properties
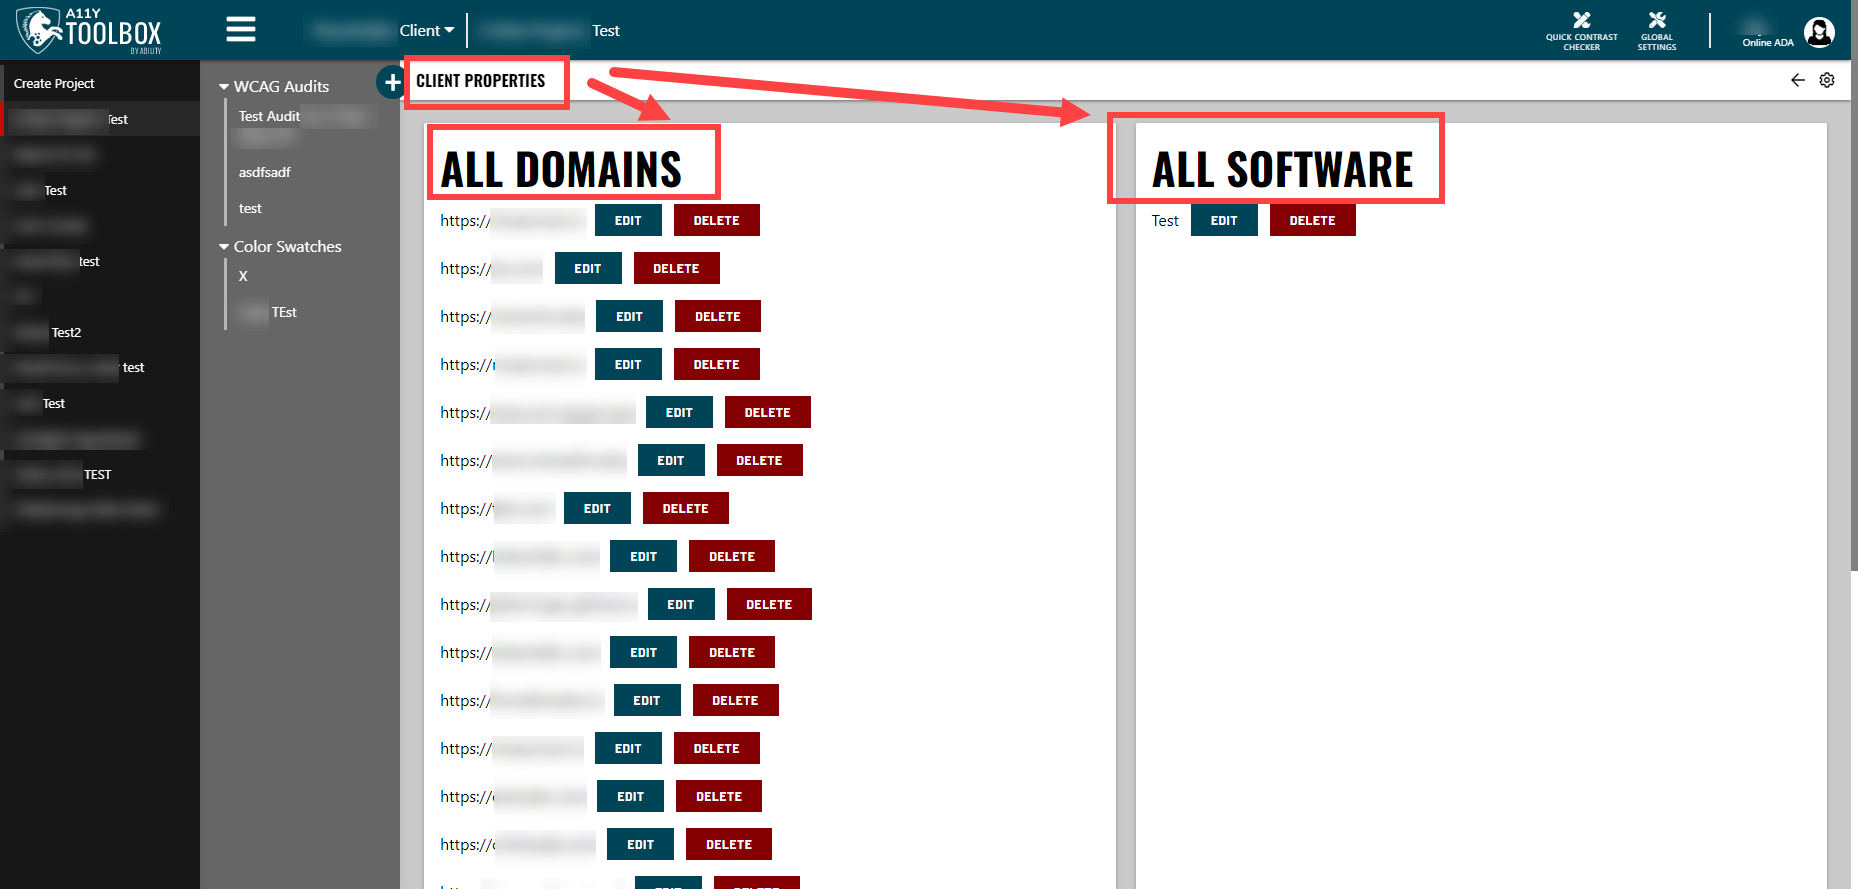
Once you’ve created at least one property, you can view it by navigating to the Client Overview page. This is the page that automatically appears when you select a client from the client drop down menu.
In addition to the quick information displayed in the main area of the page, you’ll notice two small buttons at the top right of the page. The first button, which looks like a book icon, is titled “Manage Properties.” Click it to view your entire list of properties associated with that particular client. This is called the Client Properties page, and it is the only page where you can edit or update client properties.
Adding Sitemaps and Sample Items
As mentioned above, one type of client property is a domain. In addition to simply being the client URL that you’re auditing, domains can include either a sitemap or sample items to associate with the main URL. Depending on the purpose of your audit, it may be more beneficial to use a sitemap over sample items, and vice versa.
A sitemap is a collection of every publicly available web page associated with a single domain. For very large domains, this could include hundreds or thousands of pages. If you’re doing a full audit of an entire website, making sure the domain you’re testing is linked to a sitemap is important.
Sample items are a collection of specific webpages on a website (not a website’s entire sitemap), and may include web pages that are not publicly available. Sample items can be used to track very specific instances on a website, for example: the 5 individual web pages a user may navigate through during the process of purchasing a product. If your audit only consists of tracking the user’s buyer journey, you’d want to make sure that the domain you’re testing is linked to your list of sample items instead of the domain’s entire sitemap. Having an entire sitemap associated with an audit that only follows a specific user journey would be unnecessary.
When you add a new domain during the audit creation process, the A11y Toolbox will attempt to create a sitemap for you automatically — you should not have to create a sitemap manually unless there was an error with the automatic sitemap generation.
Please note: The sitemap auto-generation will only find the publicly available web pages, and will not include unpublished pages, pages hidden behind logins, etc.
There are two ways to add a sitemap to a domain if one is not automatically generated. The first way is to navigate to the Client Properties page. Selecting the “Edit” button next to a domain will allow you to add a sitemap.
The Client Properties page is also the only page that will allow you to add/edit sample items, and is the only page where you can edit existing sitemaps.
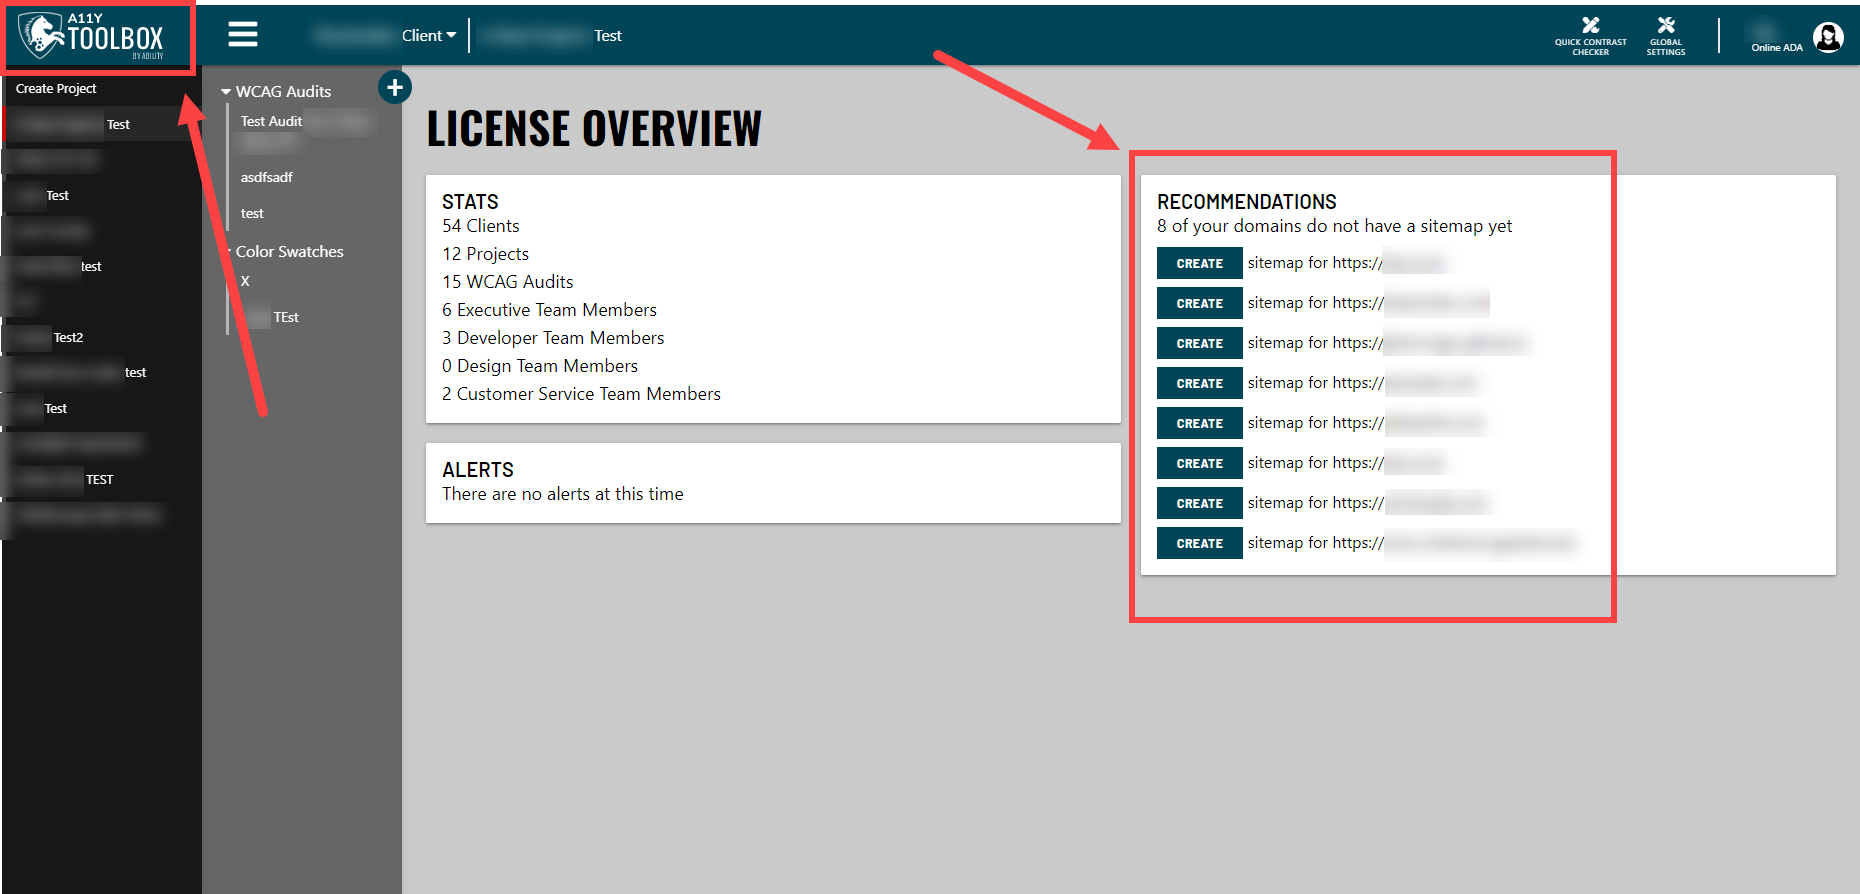
Another way you can create a sitemap if one doesn’t already exist for your domain is by clicking the A11y Toolbox logo at the top left corner of the header. The logo is also a home button that will take you to your Toolbox License Overview. The License Overview page offers a lot of quick information, including a Recommendations section. The Recommendations section will mention if any of your domains do not have a sitemap, and prompt you to create one, if necessary.
Please note: You have to have a sitemap associated with your website in order to run an automated audit.
Editing Sitemaps and Sample Items
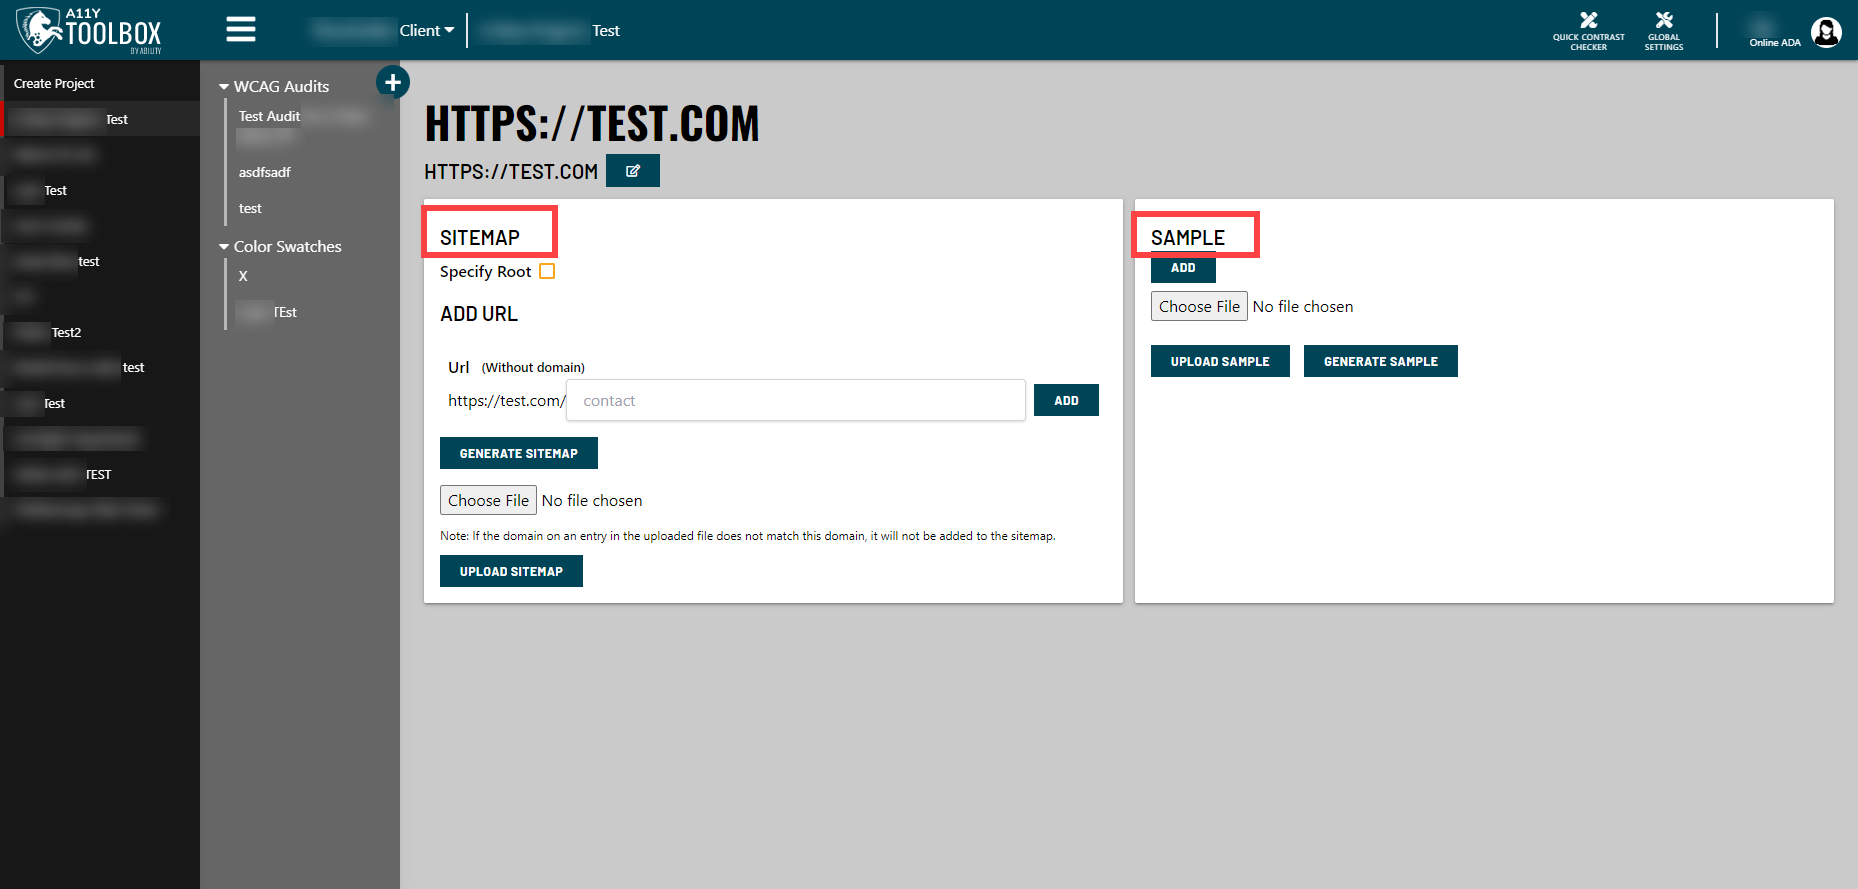
As mentioned above, the only way to edit sitemaps and sample items is through the Client Properties page. If you click the “Edit” button next to a domain on the Client Properties page, the Edit Domain page will appear.
The Edit Domain page includes details such as the current sitemap (if any) associated with the URL and includes the option to generate or upload a sitemap. It also includes the option to add, upload or generate a sample item.
If the Toolbox did not automatically generate a sitemap for your domain, you can add a new sitemap here. If you’re only interested in mapping certain pages in your domain (like the handful of pages a user visits on their buyer journey), you can add the specific pages to your list of sample items and reference those in an audit instead.
Adding/Editing Software Screens
The second type of client property in the A11y Toolbox is software. If you’re auditing a desktop or mobile application instead of a website, then you’d be working with a software client property.
The software client property has a very similar setup to the domain client property. Just like adding a new domain, the only way you can add a new software is through starting a new audit and following the prompts to add a new software in the “Create a New Audit” pop up window.
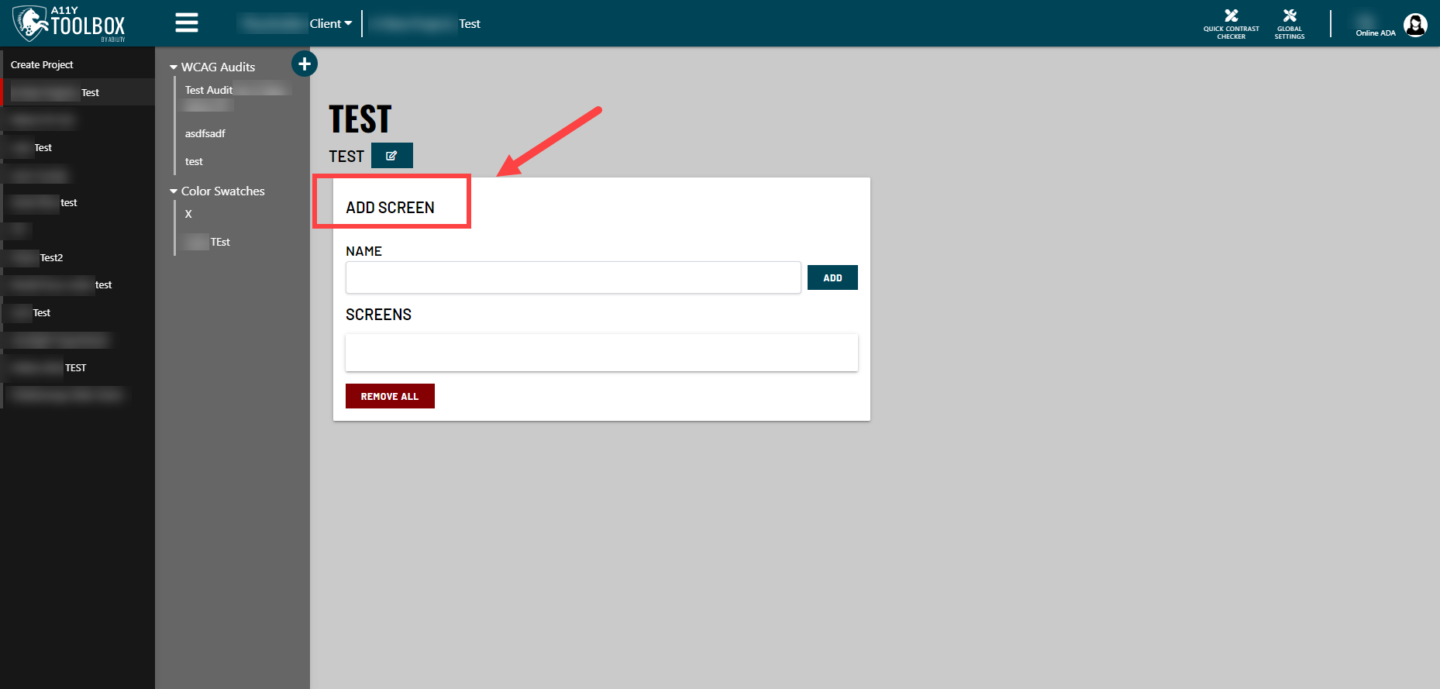
Similarly, to edit an existing software, you’ll navigate to the Client Properties screen (select a client from your client list → click the “Manage Properties” button at the top right of the Client Overview page) and select the “Edit” button to the right of a listed software. This will pull up the Edit Software page. Here, you’ll have the ability to add screens.
While the domain client property can include either a sitemap or sample items, the software client property can only include screens.
Sitemaps are not an option under the software client property because a sitemap has to be associated with a URL and shows publicly available pages. Software applications usually involve a login and don’t always have a URL associated with them. Sample items are also not an option under software because they are also associated with a URL, and again, software apps don’t always have URLs.
That leaves screens.
Screens function very similarly to sample items, but do not include any specific URL. Instead, they refer to all of the information that the user sees within their screen (whether it’s a mobile phone, tablet, computer, etc), like a screenshot. Users don’t necessarily see an entire webpage when they’re using an app – sometimes they’ll only see a menu, or a pop up window, or a section of a page, or a form, etc. – so a screen refers to all of the information that a user would see at one specific point in time.
Screens can be used to track very specific instances of a user moving through a software, like the 5 individual screens a user sees as they purchase a product through an app (very similarly to how sample items function for domains). Since the user is navigating an application, these 5 screens would help you reference the appropriate parts of the user’s buyer journey during an audit.
When you add a list of screens to your software, you’ll be able to select them during an audit just like you would a collection of sample items.
Please note: Automated audits rely on being able to access a sitemap on a publicly available website. Therefore, you are only able to run automated audits on websites that have a corresponding sitemap.
You cannot run an automated audit on a software application since what is displayed on the screen isn’t always a full page of a website. However you can still perform manual audits on apps and track app projects with the A11y Toolbox.