The A11y Toolbox is a multi-faceted software that digital accessibility teams can use for all of their auditing needs. Because there is so much useful functionality packed into one software, here’s a brief introduction to the toolbox layout and all of the information you can find within it:

Main Menu

The hamburger menu on the left side of the header is the main menu in the toolbox. It is where you’ll locate all of your projects, tools, and audits.

Project List

When you click on the main menu, your list of projects will appear to the far left of the page. At the top of the list is the option to create a new project.

Tools / Individual Audits List

If you select a project from the Project List, the Tools and Audits List will appear as a sub-menu to the right of your projects. This menu includes all of the content you have created using the toolbox, which are currently broken down into WCAG Audits, Media Audits, and Color Swatches.

At the top of this sub-menu is the “Deploy a Tool” button that shows a plus icon, which is where you can access all of the tools in the toolbox (currently including a WCAG Audit, Media Audit, or Color Swatch Analysis). When you click the button, a new window will pop up. Here you can choose which tool you want to use.

Project Overview

When you select a project, the Project Overview will automatically display in the main body area of the screen, to the right of the menus. The Project Overview contains stats about your audit including a variety of stats, possible alerts, and recommendations.

The Stats shown include the number of WCAG audits, number of times a tool has been deployed, the number of domains being used in this project, and the number of sitemaps included.

Alerts and recommendations are both an automated process that the Toolbox software will perform on its own. Examples could include recommending that you add a sitemap, for example. Having empty alerts or recommendations is not a bad thing!

Client List

To the right of the main menu in the header is your client menu. Here is where you can either choose a client from your client list or create a new client. Creating a client is always the first step you’ll need to take before starting any projects or audits for them. 

Active Project

To the right of the client menu in the header, you’ll see your currently active project. This is an organizational aid so you can see your active client and active project right next to each other.

Quick Contrast Checker Tool

Toward the right side of the header, you’ll find the Quick Contrast Checker tool.

This tool is almost exactly the same as the Color Swatch Analysis tool that you can use within client projects – the main difference is that any information or results you get with this Quick Contrast Checker will NOT be saved. This is a very handy tool to use if you’re checking lots of components back to back and don’t need to save every single result.

The Quick Contrast Checker is a great tool for designers, who are building or fixing web pages and need to meet proper color contrast requirements.

If you’re wanting to save your results or associate them with a client’s asset, etc, you should use the full Color Swatch Analysis tool instead.

Global Settings

The Global Settings, located on the right side of the header, is where you can customize your Toolbox account. You can change the WCAG Success Criteria that show up as options in your audits, add or edit users in your Toolbox account (you must have a Manager role on the Executive team to add members – this is the default role and team that the first user associated with a Toolbox account will have), add or edit your account properties such as site domains or software, and even view any/all of the automated audits you’ve run with their corresponding information.

User Settings

The A11y Toolbox User Settings, located on the far right side of the header, include your personal user profile and the logout button.

When you use the A11y Toolbox for your accessibility auditing needs, you’ll have a variety of tools at your disposal. Accessibility auditing professionals specifically have two audit tools available to them: the WCAG Audit and the Media Audit.

The WCAG Audit tool is designed to streamline the auditing process, allowing you to quickly add applicable WCAG references and create customized audits for clients. In addition to creating audits from scratch, the WCAG Audit tool has the ability to import prior audit results to start a second, comparative audit (which you can read about in this separate tutorial).

For step by step instructions on how to set up your first client, project, and WCAG Audit, read the tutorial below.

Add Your Client

Once you’ve logged into your Toolbox account, the first step you’ll need to take before you can create an audit is to add a client to your client list. To do this, navigate to the Client List located to the right of the main hamburger menu. Once selected, choose “Create Client.”

A “Create New Client” pop-up window will appear – here you’ll input the client’s name. After you have added the client’s name, select the “Create” button. Your client will then appear in your client list.

Create a Project

The next step after creating your client is to create a project. Projects are useful for a variety of reasons, like keeping track of separate application and website projects you may be working on simultaneously for a single client.

To create a new project, you’ll select your client from the Client List and then click the hamburger menu at the top of the page. This will pop up the main menu, and a “Create Project” option will appear at the top of the list. Click “Create Project” to open the pop up window.

The Create New Project pop up window will appear. In this window, you will add a name to your new project. Then select the “Create” button at the bottom of the window.

Starting a New WCAG Audit

With your new project set up, you are now ready to add your first audit. To do this, select the “Deploy a Tool” button that shows a plus icon at the top of the Audit menu. This will open up the A11y Toolbox tool selection window.

Select “WCAG Audit” from the list of available tools. This will automatically change the pop up window to include the WCAG Audit setup options.

WCAG Audit Setup

Before you create your audit, you’ll have one final round of setup information to complete in the “Create New WCAG Audit” pop up window, which includeds adding a title, scope, property, and domain/software. Select the “Deploy” button at the bottom of the pop up window to create your new audit.

Congratulations! You’ve created your first audit!

WCAG audits have a variety of customization options available within them, even after you’ve set up their initial structure. For an in-depth look at the buttons, actions, and customization options inside a WCAG Audit, check out our WCAG Audit Customization tutorial (coming soon).

Manual audits are absolutely necessary in order to find all of the accessibility issues on a website or app; however, starting a new project with an automated audit can give you an initial jump on the remediation process.

An automated audit will scan your website and find any machine-detectable accessibility issues, which you can then immediately address or fix. After remediating as many of the issues as possible, you can follow up with a manual audit.

So, how do you perform an automated audit at the beginning of a new client project?

Initiate an Automated Audit

After starting a new audit in a client project, you’ll see a blank audit page with text that reads “There are no issues currently. Add issues or run an automated audit.” You can either click the “Initiate an Automated Audit” button that is next to the text, or at the top right of the page, you can click the same “Initiate an Automated Audit” button from the list of options. Select the button to pull up your automated audit options.

Please note: You must have a sitemap associated with your domain in order to run an automated audit. Sitemaps will tell the automated audit what to scan. When you add a domain to an audit during your initial setup, a sitemap should automatically be generated. If you do not have a sitemap associated with your domain, you can read about adding sitemaps and sample items here.

Automated Audit Options

On the Automated Audit Options page, you’ll have several ways you can customize your automated audit. Choose the options you want to include, or leave the default settings as is.

Keeping the default settings will run an automated audit that scans the entire sitemap (meaning the audit will scan the each page in the sitemap entirely, including repeated content like headers and footers). A default automated audit will reference the WCAG 2.0/2.1 Level A and Level AA standards, and also include Best Practice suggestions.

Start an Automated Audit

Once you have tailored the automated audit to your liking, select the “Start Automated Audit” button at the bottom of the page. Your automated audit has been generated!

The Color Swatch Analysis tool is one of the three main tools within the A11y Toolbox. In addition to being able to run audits with the WCAG and Media audit tools, the Color Swatch Analysis tool enables accessibility teams to check an asset’s color contrast without having to leave their main accessibility software. The tool also benefits team members who design or create accessible websites or applications, allowing them to choose an accessible color palette from the start.

Setting Up a New Color Swatch Analysis

To access the Color Swatch Analysis tool, navigate to the Project menu within the A11y Toolbox. Select the project you’re working on or create a new project, and then select the Deploy a Tool button (the white plus icon in a blue circle) at the top of the list of audits/swatches. The Deploy a Tool modal will appear.

Select the Color Swatch Analysis tool.

Once you select the Color Swatch Analysis tool, the modal will change and ask you to name your color swatch. Enter a name into the text field and select the Save button.

The prompt “Go to new color swatch?” will appear. Select “yes” to immediately view and start working on your color swatch (if you select no, your color swatch will still be created – you can navigate to it by selecting the Color Swatch title under the “Color Swatches” list in your projects).

Color Swatch Analysis Options

A new color swatch analysis will open to show a default comparison of two colors, black vs. white (#000000 and #FFFFFF).

You can add colors to your color palette by using the Add Color button (a plus icon inside a box to the right of your active colors). The maximum number of colors you can add to a single color swatch analysis is 6 colors.

There are several ways to choose a color to compare against your other selections. You can use the color picker or the hue slider, or you can input a specific color’s Hex number or RGB value.

The text field below the hue slider defaults to accept a color’s Hex number. To input a specific color’s RGB value instead of its Hex number, simply click the Toggle button (the stacked up and down arrows icon) to change the value type.

If you want to delete a color from your palette, select the Delete button (the trash can icon).

Once you’ve selected your colors, comparison swatches will appear below the color selection tools. The color contrast ratio will be displayed within the swatch.

If your ratio includes a checkmark, then the color contrast passes. If your ratio includes an X, then the color contrast fails.

If you want to reference specific color swatch analyses throughout a project, don’t forget to select the save button at the bottom of the screen!

The Quick Contrast Checker

In addition to the full Color Swatch Analysis tool, the Toolbox also offers the Quick Contrast Checker. It’s a mini version of the Color Swatch Analysis tool that teams can use on the fly or if they don’t need to save entire accessible color palettes.

You can find the Quick Contrast Checker in the header section of the Toolbox.

Once the Quick Contrast Checker is opened, you’ll have the ability to check two colors against each other. Select your colors by using the color picker/hue slider or by inputting the color’s Hex number/RGB value. Your resulting colors and contrast ratio will appear below the color selection tools.

Besides only offering a single foreground and background color combination to check, the Quick Contrast Checker does not allow users to save any color combos they test.

If you want to test several colors against each other or save entire color palettes, use the full Color Swatch Analysis tool. If you’re just wanting to make a quick check, use the Quick Contrast Checker!

Creating a multi-audit project is essential for auditing professionals who perform a series of audits for the same client. With the A11y Toolbox, you’re able to have as many audits within the same project as you’d like – and you’re even able to import your results from earlier audits to give yourself a head start on audits later on.

Read the tutorial below to learn how to create a multi-audit project.


Create Your Project

The first step to creating a multi-audit project is to create the project itself. After you have your client selected, click on the main hamburger menu at the top of the page and select the “Create Project” button at the top of your project list. Follow the prompts in the pop up window.

Create an Audit

Once you’ve created your project, you will see a second menu appear with all the tools in the toolbox and any individual audits you may have. To create a new audit, select the “Deploy a Tool” button that shows a plus icon at the top of this second menu. Follow the prompts in the pop-up window to set up your new audit.

Import Prior Audit Results

If this is your second audit, you’ll have the ability to import the issues/results from your first audit into your second. To do this, go to the audit customizing options menu at the top of the audit. Here, you will see an “Import Issues to this Audit” button. Make sure to also select which specific issues you want to import from the audit preview that appears below, then select the “Finish and Go to Audit” button at the bottom of the page.

For an in-depth walkthrough on this step, read our other tutorial on importing audit results.

View Multiple Audits in One Project

Once you have created multiple audits, you’ll see all of your audits displayed under the “WCAG Audits” portion of the main menu and nested under your project’s name.

You’ve now set up a multi-audit project!

One of the benefits of the A11y Toolbox is the ability to import one audit’s results into another audit. This is an extremely beneficial – and time-saving – action for auditing professionals who perform a series of audits for a single client. When rechecking a client’s website or other digital asset for a second time using the Toolbox, you won’t have to manually add the same issues again – you just need to import them.

Here’s the simple, three step process:

Step 1: Create a New WCAG Audit

Once you’ve logged into your A11y Toolbox account, selected a client, and selected a project, you’ll need to create a new audit. To do that, select the “Deploy a Tool” button that shows a plus icon at the top of the Audit menu. Follow the setup prompts in the pop-up window and create your audit.

If you’re looking for an in-depth walkthrough of setting up your first client, project, and audit, read this other useful tutorial.

Step 2: Select the Import Issues Button

After creating a new audit, you’ll see an empty audit screen. To import a previous audit’s results, go to the audit customization options menu at the top of the audit. Here, you will see an “Import Issues” button. Select it to open your audit and issue choices. 

Step 3: Choose Your Audit(s) and Issues

The final step to import a prior audit’s results is to choose which audit and audit issues you’d like to use.

Under the section “Choose which audits to compare” you’ll see a list of audits under your current project. Select which audit you’d like to compare/import – you can also choose multiple audits. Once your audits have been selected, a preview of each audit will appear below.

In the preview, you’ll see all issues included in that audit. Here you can select the exact issues you’d like to import (this is particularly beneficial if you want to import results from multiple audits but have duplicate issues in each that you don’t want to import twice).

After you’ve chosen the specific audits and issues you’d like to import, select the “Finish and Go to Audit” button at the bottom right of the page.

Your results have been imported!

All audits that you run in the A11y Toolbox must be associated with a client property. Being able to reference a client property that is thoroughly fleshed out with the relevant information will allow you to make more specific references within an audit.

client properties that include all of the information you need allows you to make more specific references within an audit.

There are two types of properties that you can apply to an A11y Toolbox audit: domains and software.

Each type of property can be broken down into specific components that are necessary for creating an audit, like sitemaps, sample items, and screens. Below is a quick list to break down how they relate to each other.

Types of Client Properties:

  1. Domains
    • Includes: Sitemaps, or
    • Includes: Sample Items
  2. Software (desktop or mobile apps)
    • Includes: Screens

This tutorial article will explain what properties, sitemaps and sample items are, why (and when) you should include them, and where you can locate them in the Toolbox.

Adding New Client Properties

If you are performing an audit for a client, the client property will be what you’re auditing. While a domain will obviously refer to the client’s website, software can refer to either a desktop app or a mobile app.

As a general rule to remember, properties are always associated with the client they belong to. You cannot access a property without first choosing a client.

There is only one way to create new client properties: add one when you create a new audit in the Toolbox.

When you create a new audit, the “Create New WCAG/Media Audit” pop up window will appear. Under the Choose a Property section, you’ll be able to choose your property type: a website, a desktop app, or a mobile app. Underneath these options, you’ll see an “Add a New Domain” or “Add a New Software” button, depending on what type of property you’ve selected. Once you’ve entered your new property information, select the “Add Domain” or “Add Software” button. Your property will be added to the Toolbox and be associated with the active client.

Viewing/Editing Client Properties

Once you’ve created at least one property, you can view it by navigating to the Client Overview page. This is the page that automatically appears when you select a client from the client drop down menu.

In addition to the quick information displayed in the main area of the page, you’ll notice two small buttons at the top right of the page. The first button, which looks like a book icon, is titled “Manage Properties.” Click it to view your entire list of properties associated with that particular client. This is called the Client Properties page, and it is the only page where you can edit or update client properties.

Adding Sitemaps and Sample Items

As mentioned above, one type of client property is a domain. In addition to simply being the client URL that you’re auditing, domains can include either a sitemap or sample items to associate with the main URL. Depending on the purpose of your audit, it may be more beneficial to use a sitemap over sample items, and vice versa.

A sitemap is a collection of every publicly available web page associated with a single domain. For very large domains, this could include hundreds or thousands of pages. If you’re doing a full audit of an entire website, making sure the domain you’re testing is linked to a sitemap is important.

Sample items are a collection of specific webpages on a website (not a website’s entire sitemap), and may include web pages that are not publicly available. Sample items can be used to track very specific instances on a website, for example: the 5 individual web pages a user may navigate through during the process of purchasing a product. If your audit only consists of tracking the user’s buyer journey, you’d want to make sure that the domain you’re testing is linked to your list of sample items instead of the domain’s entire sitemap. Having an entire sitemap associated with an audit that only follows a specific user journey would be unnecessary.

When you add a new domain during the audit creation process, the A11y Toolbox will attempt to create a sitemap for you automatically — you should not have to create a sitemap manually unless there was an error with the automatic sitemap generation.

Please note: The sitemap auto-generation will only find the publicly available web pages, and will not include unpublished pages, pages hidden behind logins, etc.

There are two ways to add a sitemap to a domain if one is not automatically generated. The first way is to navigate to the Client Properties page. Selecting the “Edit” button next to a domain will allow you to add a sitemap.

The Client Properties page is also the only page that will allow you to add/edit sample items, and is the only page where you can edit existing sitemaps.

Another way you can create a sitemap if one doesn’t already exist for your domain is by clicking the A11y Toolbox logo at the top left corner of the header. The logo is also a home button that will take you to your Toolbox License Overview. The License Overview page offers a lot of quick information, including a Recommendations section. The Recommendations section will mention if any of your domains do not have a sitemap, and prompt you to create one, if necessary.

Please note: You have to have a sitemap associated with your website in order to run an automated audit.

Editing Sitemaps and Sample Items

As mentioned above, the only way to edit sitemaps and sample items is through the Client Properties page. If you click the “Edit” button next to a domain on the Client Properties page, the Edit Domain page will appear.

The Edit Domain page includes details such as the current sitemap (if any) associated with the URL and includes the option to generate or upload a sitemap. It also includes the option to add, upload or generate a sample item.

If the Toolbox did not automatically generate a sitemap for your domain, you can add a new sitemap here. If you’re only interested in mapping certain pages in your domain (like the handful of pages a user visits on their buyer journey), you can add the specific pages to your list of sample items and reference those in an audit instead.

Adding/Editing Software Screens

The second type of client property in the A11y Toolbox is software. If you’re auditing a desktop or mobile application instead of a website, then you’d be working with a software client property.

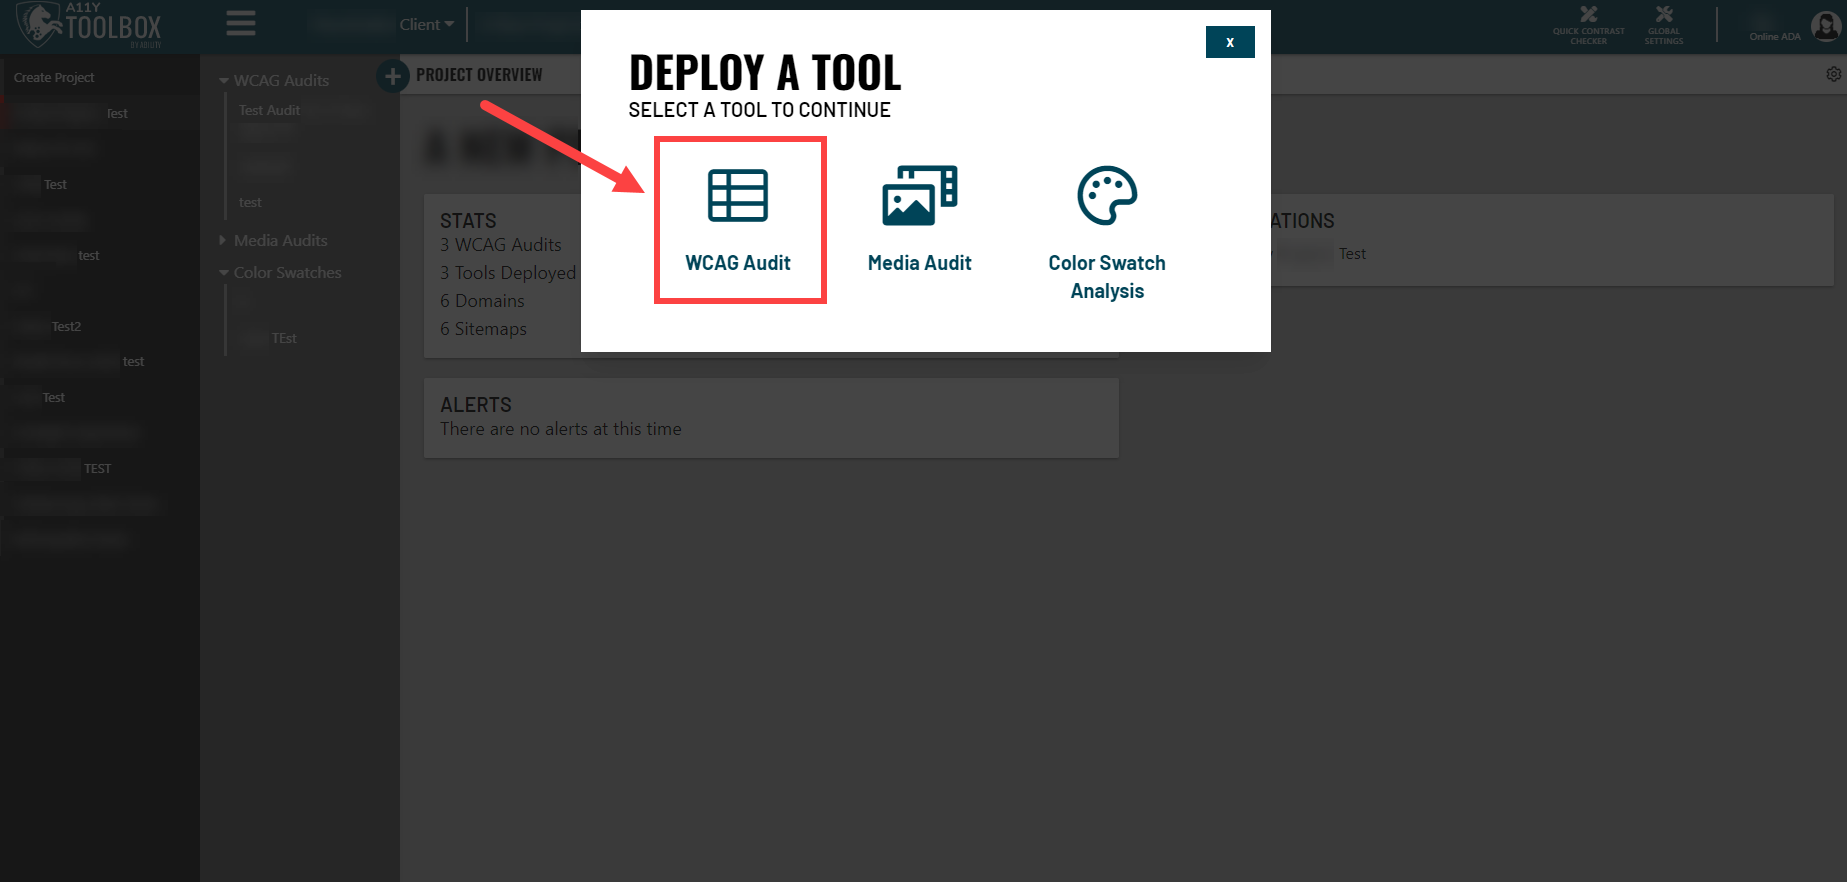
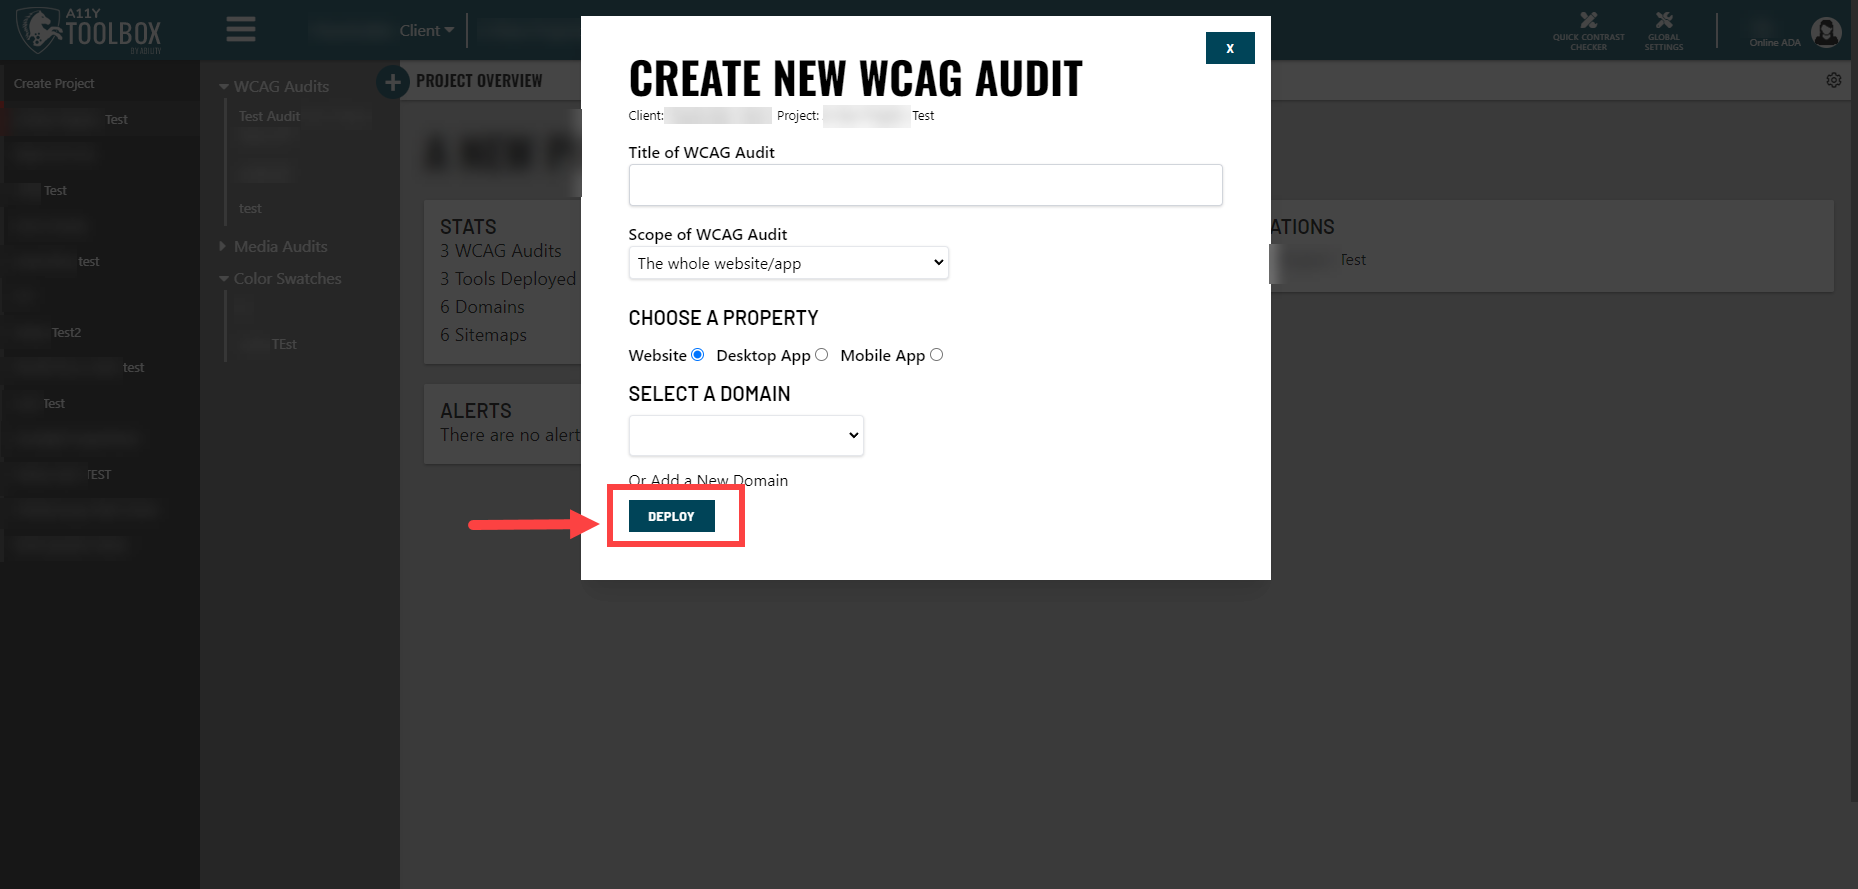
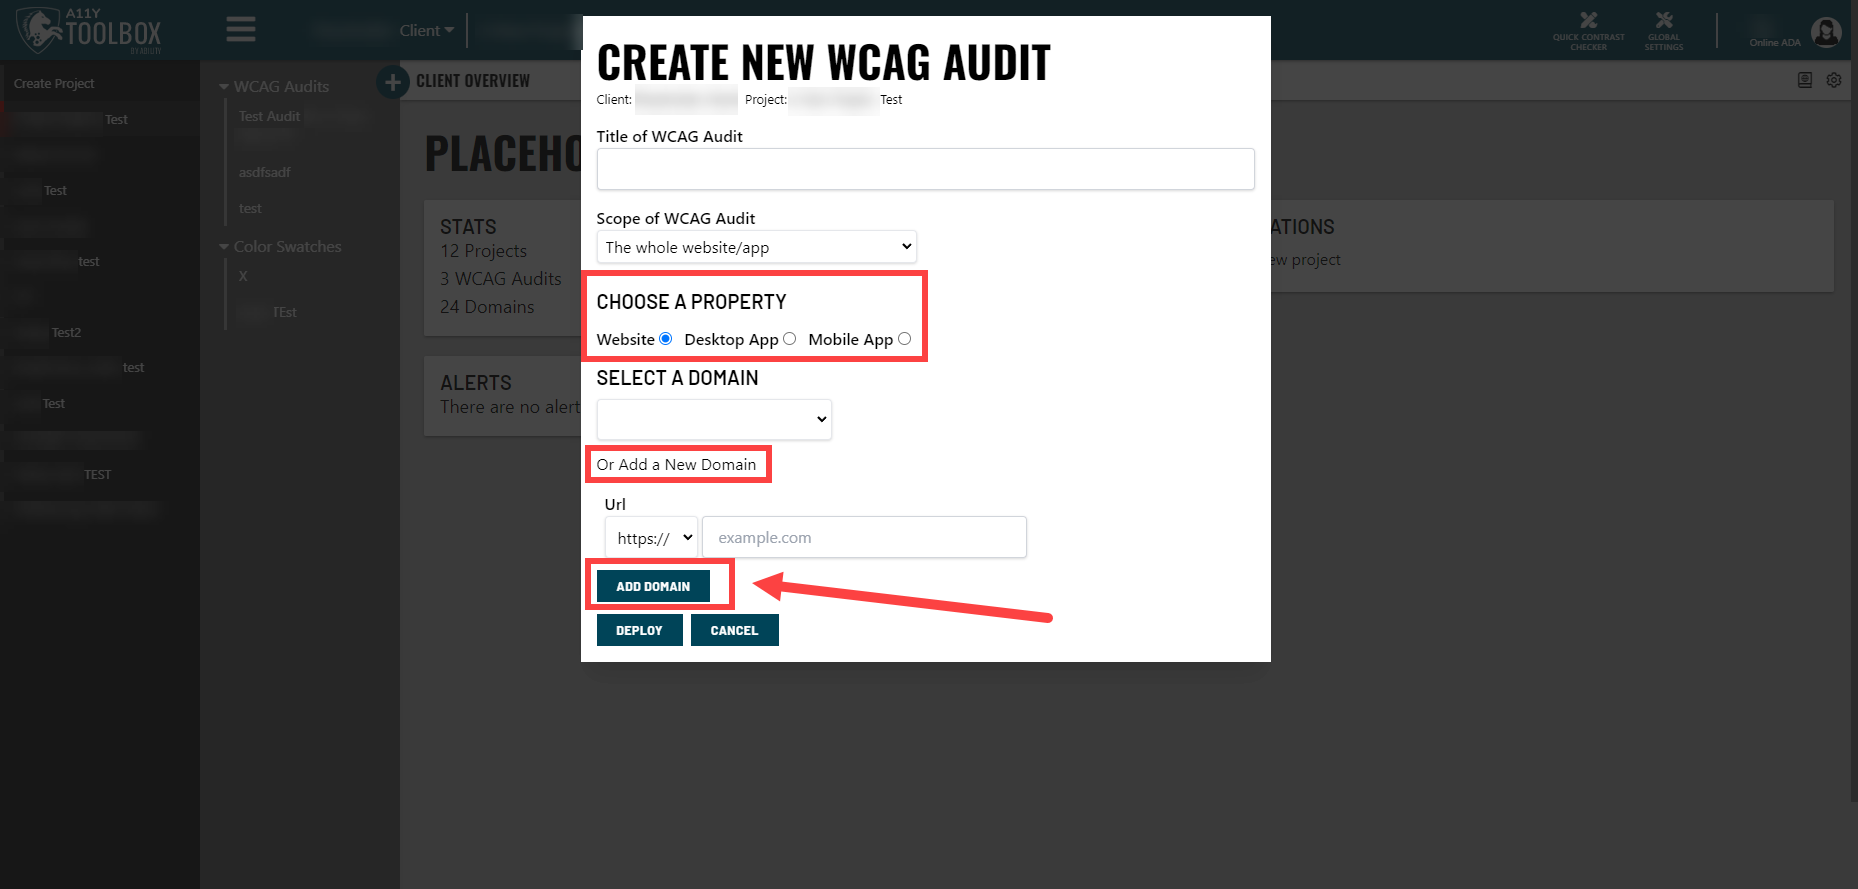
The software client property has a very similar setup to the domain client property. Just like adding a new domain, the only way you can add a new software is through starting a new audit and following the prompts to add a new software in the “Create a New Audit” pop up window.

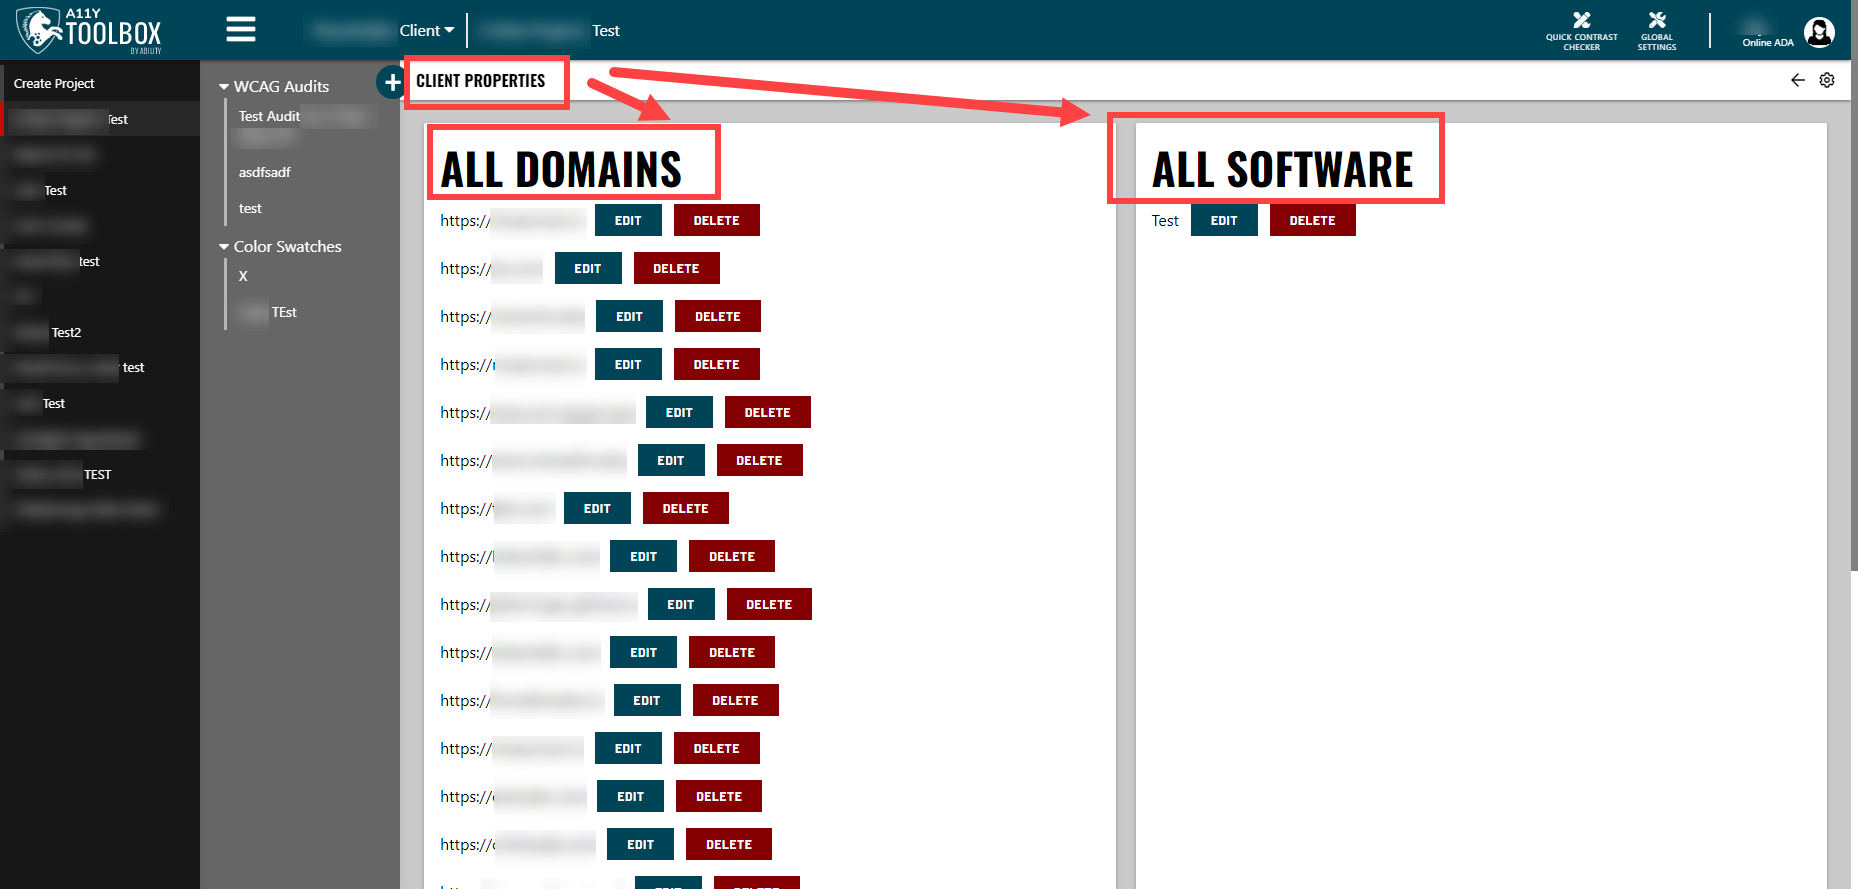
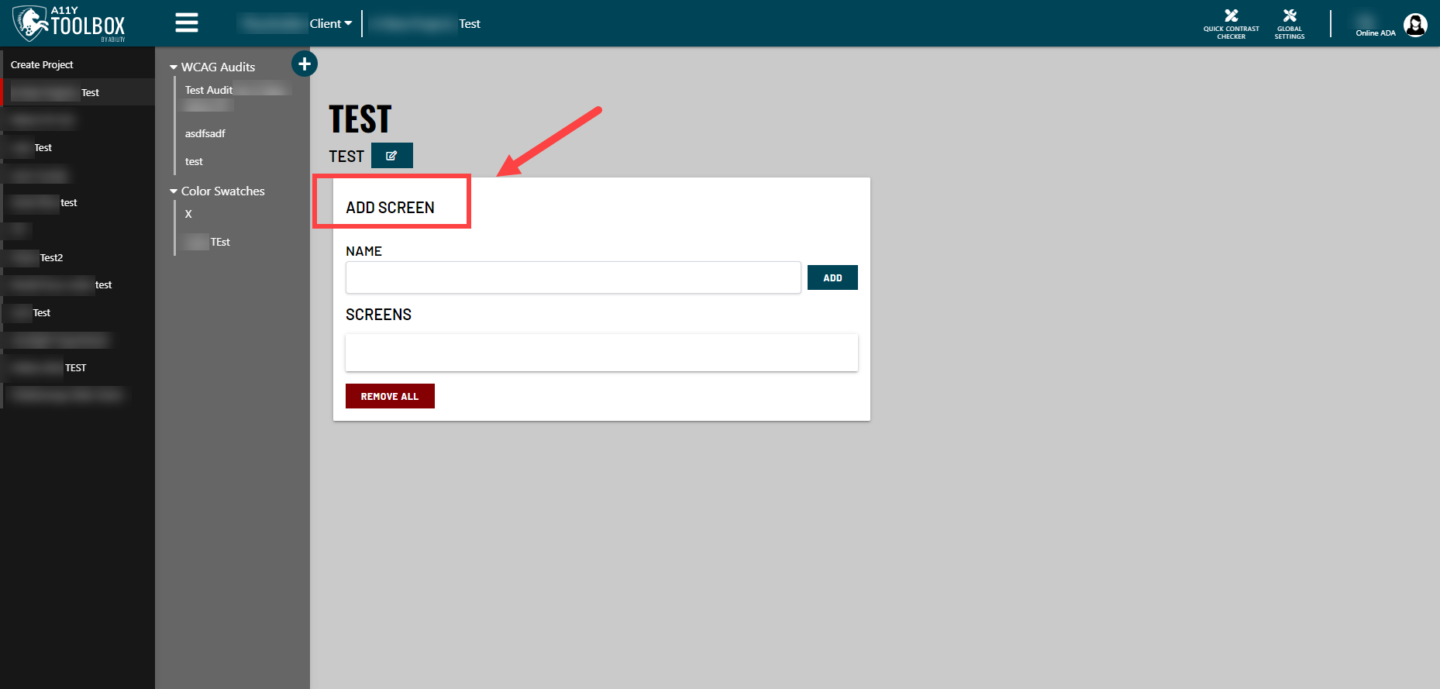
Similarly, to edit an existing software, you’ll navigate to the Client Properties screen (select a client from your client list → click the “Manage Properties” button at the top right of the Client Overview page) and select the “Edit” button to the right of a listed software. This will pull up the Edit Software page. Here, you’ll have the ability to add screens.

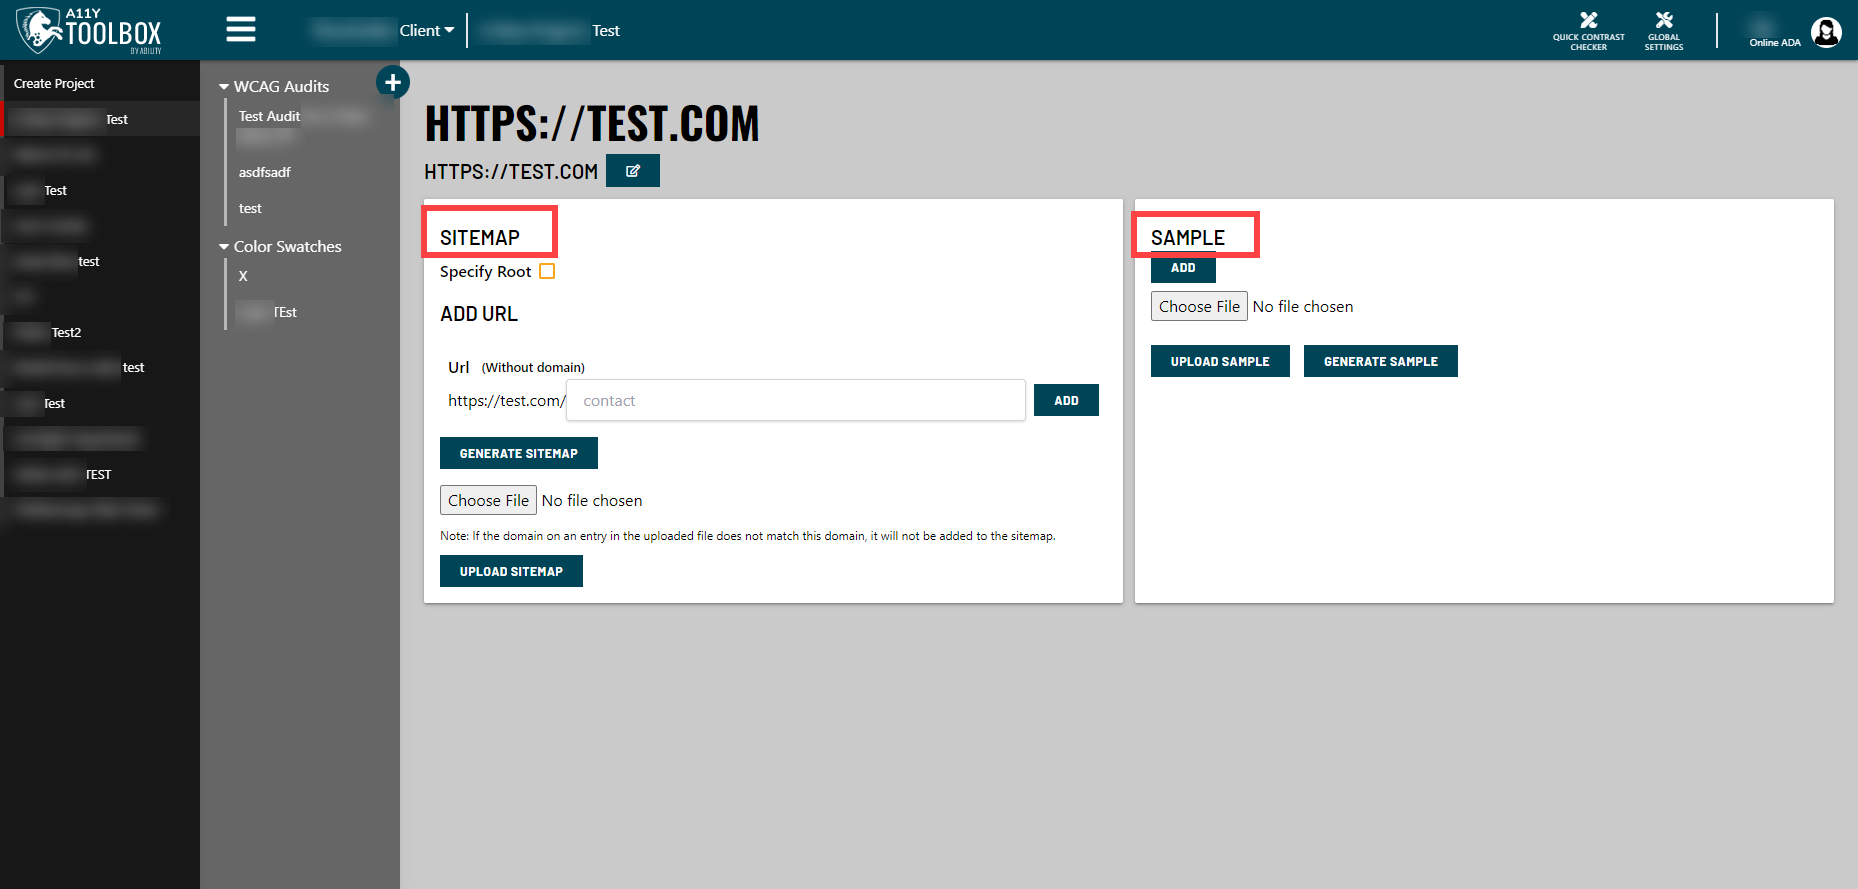
While the domain client property can include either a sitemap or sample items, the software client property can only include screens.

Sitemaps are not an option under the software client property because a sitemap has to be associated with a URL and shows publicly available pages. Software applications usually involve a login and don’t always have a URL associated with them. Sample items are also not an option under software because they are also associated with a URL, and again, software apps don’t always have URLs.

That leaves screens.

Screens function very similarly to sample items, but do not include any specific URL. Instead, they refer to all of the information that the user sees within their screen (whether it’s a mobile phone, tablet, computer, etc), like a screenshot. Users don’t necessarily see an entire webpage when they’re using an app – sometimes they’ll only see a menu, or a pop up window, or a section of a page, or a form, etc. – so a screen refers to all of the information that a user would see at one specific point in time.

Screens can be used to track very specific instances of a user moving through a software, like the 5 individual screens a user sees as they purchase a product through an app (very similarly to how sample items function for domains). Since the user is navigating an application, these 5 screens would help you reference the appropriate parts of the user’s buyer journey during an audit.

When you add a list of screens to your software, you’ll be able to select them during an audit just like you would a collection of sample items.

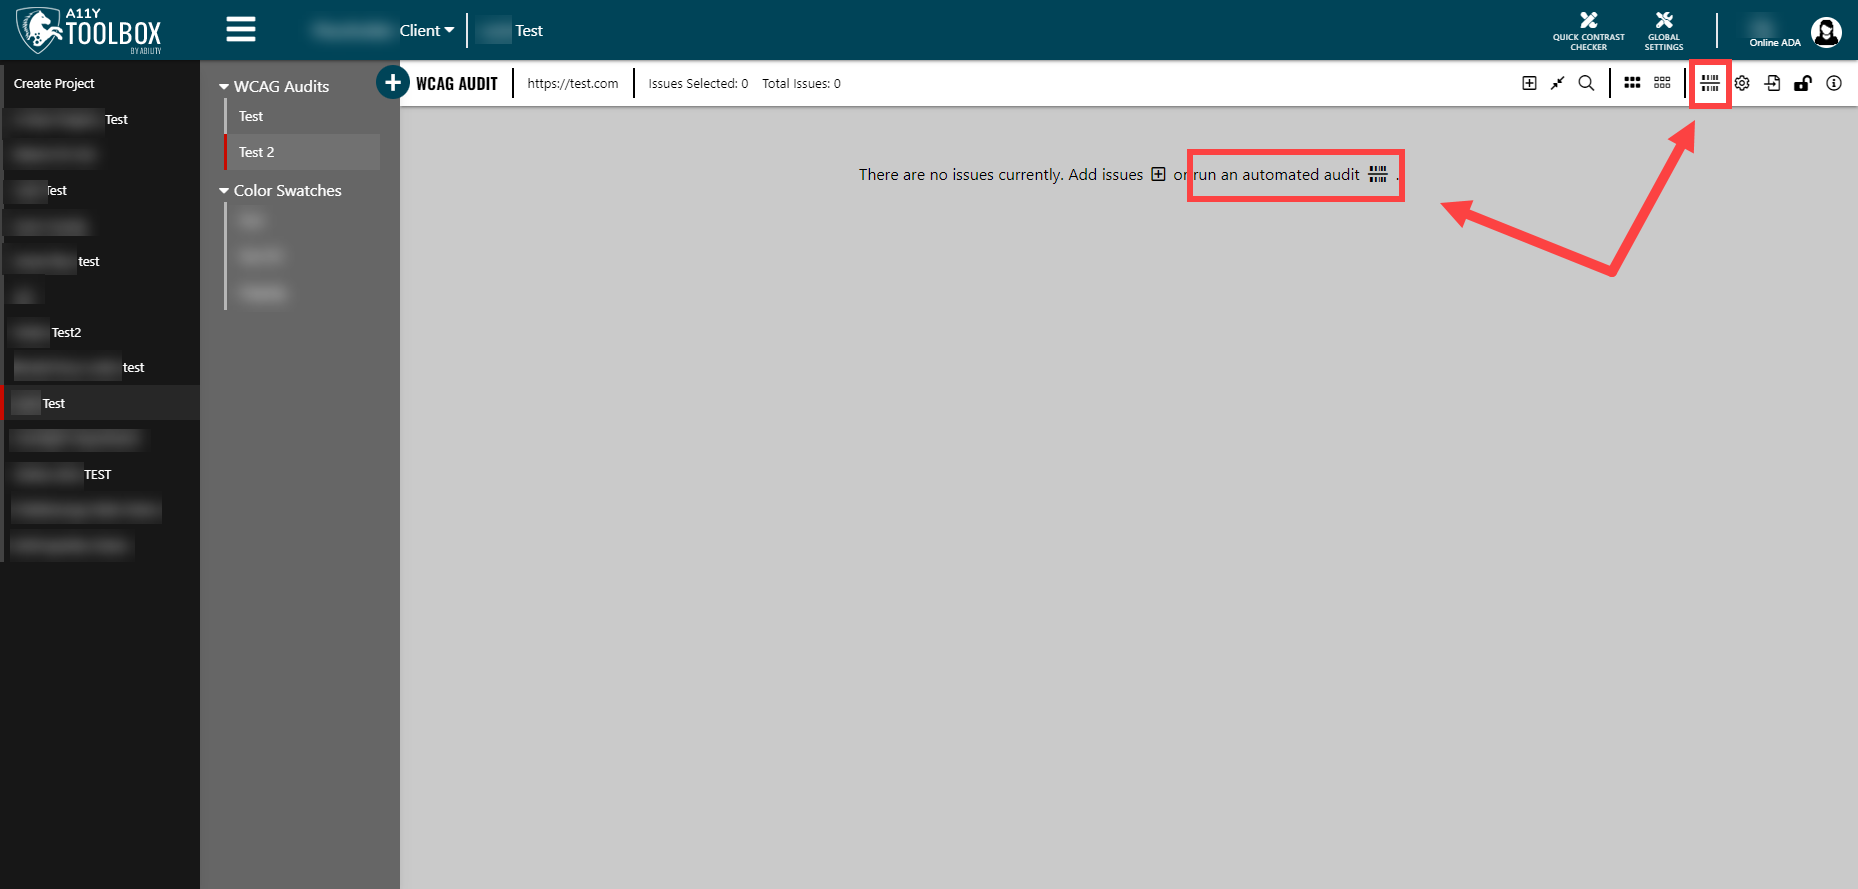
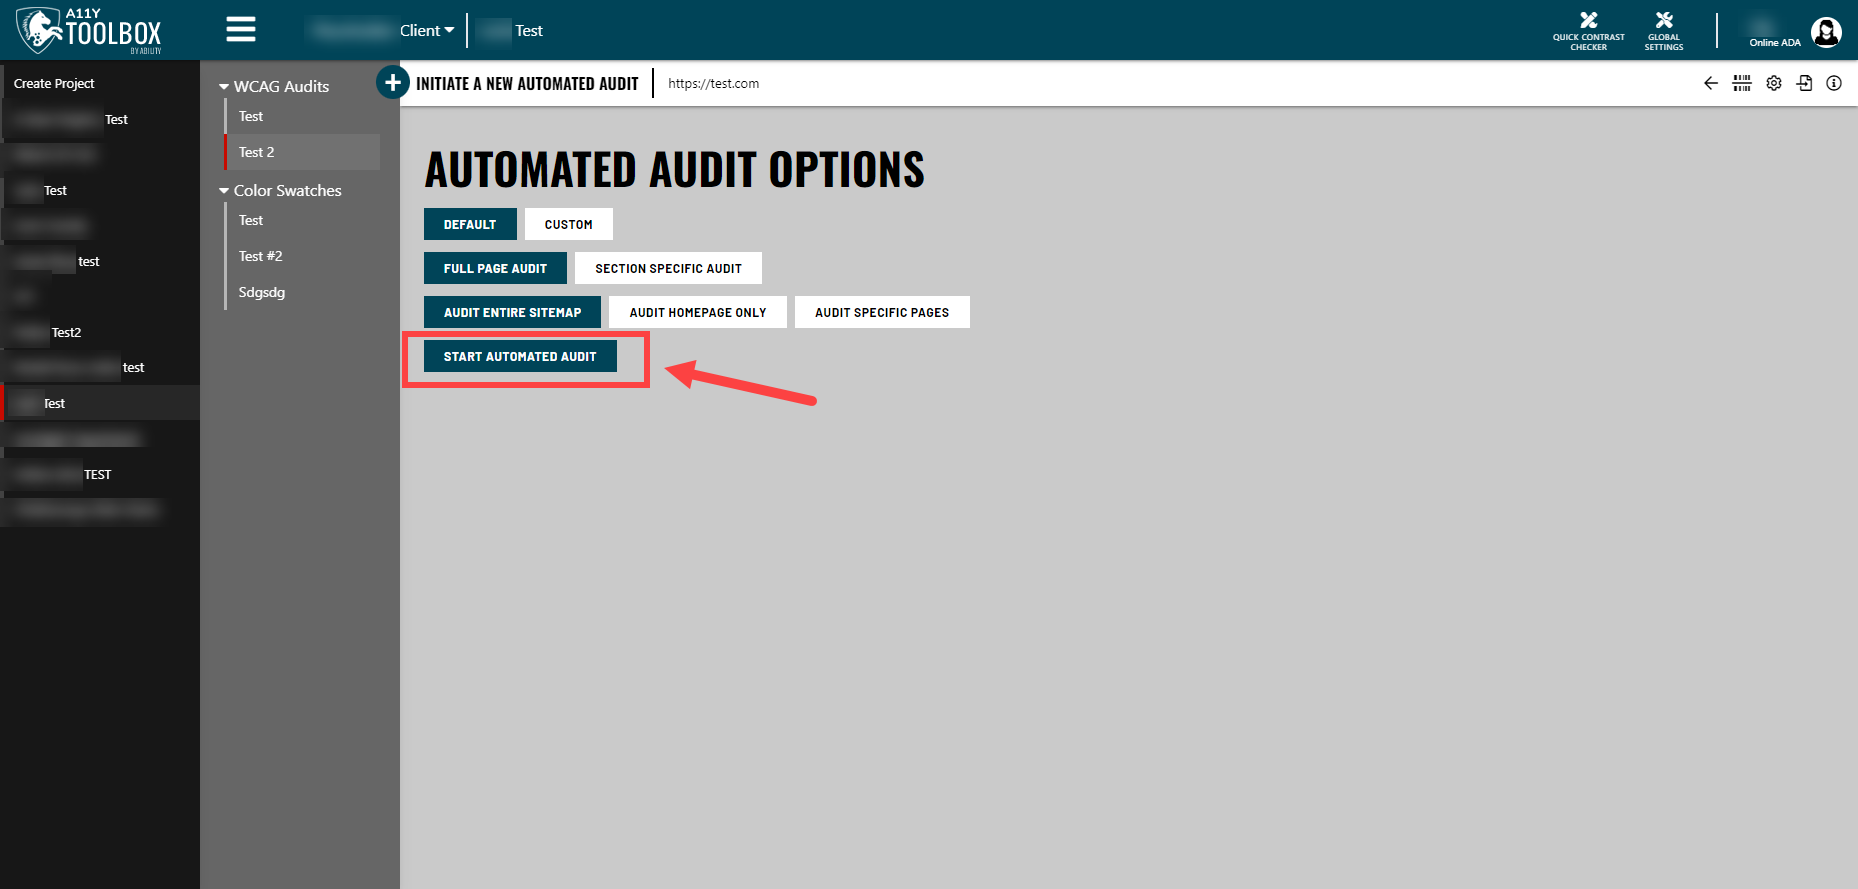
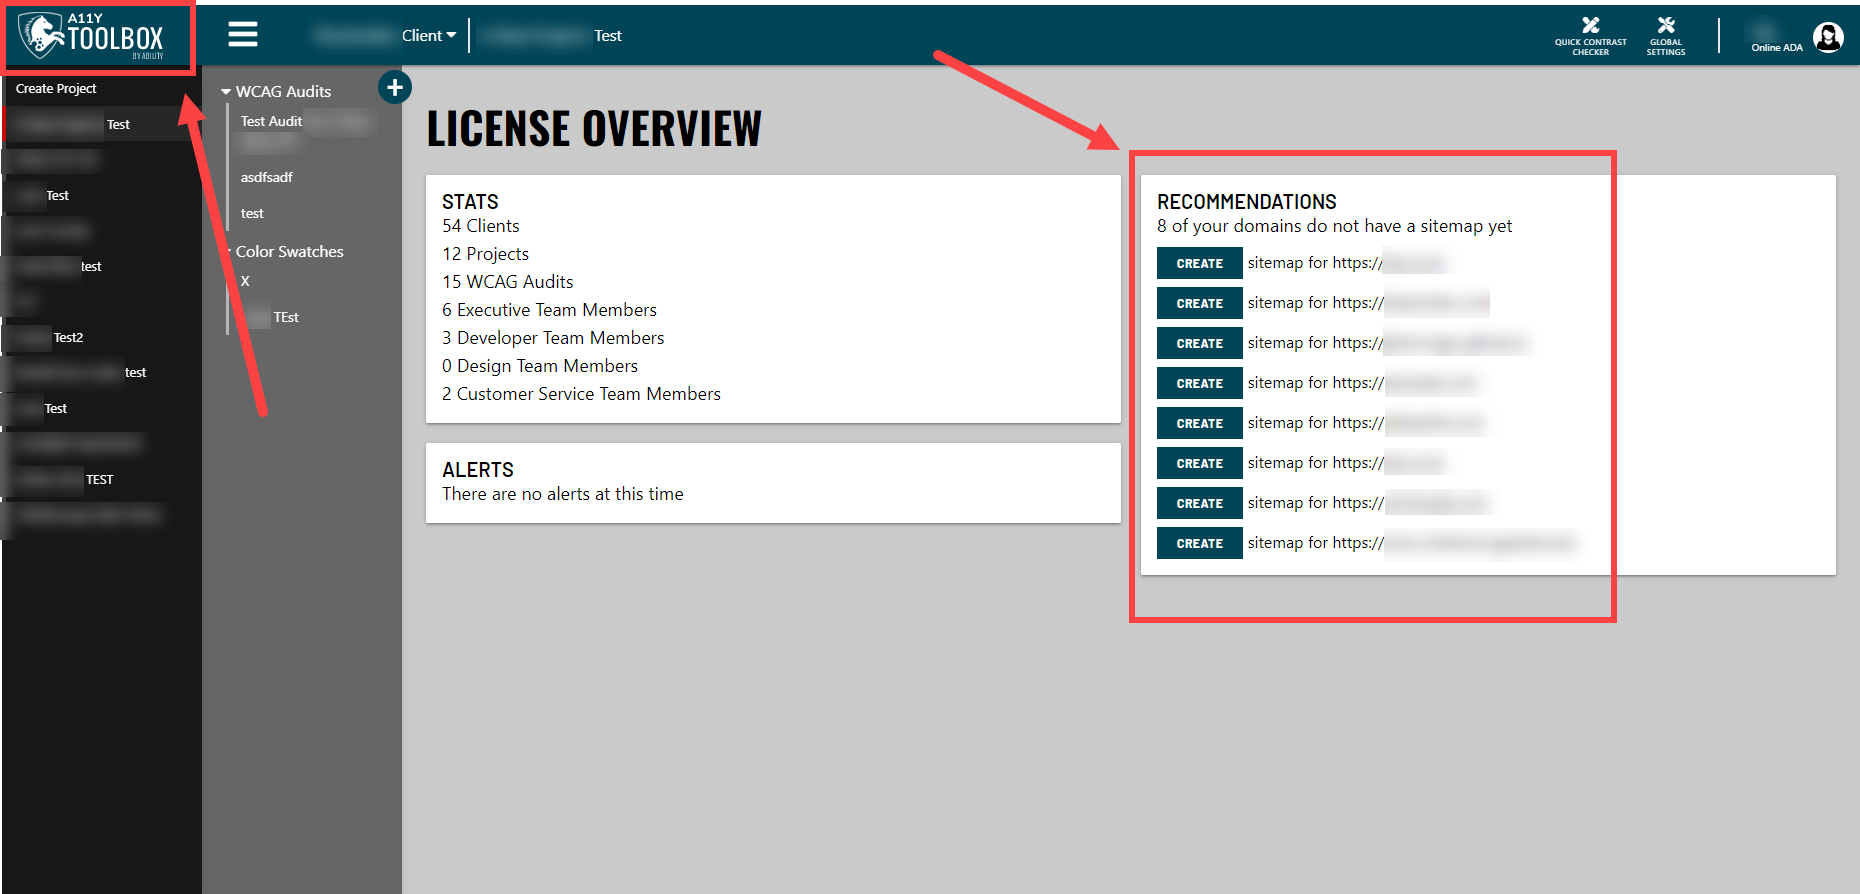
Please note: Automated audits rely on being able to access a sitemap on a publicly available website. Therefore, you are only able to run automated audits on websites that have a corresponding sitemap.

You cannot run an automated audit on a software application since what is displayed on the screen isn’t always a full page of a website. However you can still perform manual audits on apps and track app projects with the A11y Toolbox.

If you have a growing team or have team members who shift between different roles, you may need to add or edit users within the A11y Toolbox. Luckily, it’s a straightforward process!

This tutorial details the two different ways you can add users to your account through the Toolbox, along with the single way to edit users through the Toolbox.

For a detailed explanation of how users are organized within the Toolbox and ABILITY’s overall V4 Platform, read our other tutorial that breaks down user teams, roles, and access.

Navigating to the Users Page

Once you’ve logged into your A11y Toolbox account, you can view all users on your account by navigating to the “Global Settings” option in the header of the Toolbox.

From the drop down menu, select the “Users” option. This will take you to a list of users associated with your account.

Adding Users

**Executive team members are the only ones who can add new users to any team. Managers in the Development, Design, and Customer Service teams can only add members to their own teams. If you are not a Manager or Executive team member, you will NOT see the Add Users button.**

If you’re a Manager or a member of the Executive team, you will see an “Add Users” button at the top of the page. Select this button to add a new user. The Add Users modal will appear.

There are two ways to add a user to your A11y Toolbox account:

  1. Invite a brand new user to the Toolbox (Please note: this will also add them to your list of users in your overall ABILITY account, the V4 Platform), or
  2. Give an existing account from your V4 dashboard access to the Toolbox.

If you want to add a brand new user, enter their email address in the text box under the Invite a New User heading and choose their corresponding team and role. Then, click the “Invite User” button. An email will be sent to the user and prompt them to set up their account.

To give an existing account access to the Toolbox, simply search for and select the user from the list of existing users that is displayed. Then click the “Add Users” button.

Editing User Teams and Roles

To change the team or role associated with an existing user in the A11y Toolbox, navigate to the Users page under the Toolbox’s Global Settings.

Select the “Edit” button next to the user’s name/account. This will pull up the Manage User page.

From here, you can change the role or team associated with that user by selecting their new status from the two drop down menus. All changes are automatically saved.

All of ABILITY’s software (the A11y Toolbox, the Partner Agency Program, Max Access, etc.) is managed through one unified platform, called the V4 Platform. No matter how many software you have a license for, users will only have one login, username, and password to remember. Minimizing the number of logins makes accessing all licensed and available software much easier for users.

Because the V4 Platform unifies all of ABILITY’s software, user accounts and user access will be the same for each software. This means that any changes to your user settings through the A11y Toolbox will be reflected across the entire V4 Platform and other active software. Please keep this in mind when assigning or changing user access within the Toolbox.

To access your user list via the V4 Platform, go to ABILITY’s website, www.onlineada.com, and select My Account from the main navigation menu. The Agency Settings option (a gear icon) in the header of the V4 Platform offers access to the same user list as the Global Settings option (a tools icon) in the A11y Toolbox.

User Teams and Roles

The V4 Platform and the A11y Toolbox incorporate various user levels to minimize accidental changes to your client projects.

User accounts are organized into both teams and roles. By assigning each user account a specific team and role, users will only be able to perform team- and role-specific actions.

From there, users will have varying types of access within projects and to the Toolbox in general. The types of access that are associated with the teams and roles are:

  • Upgrading/Downgrading access for the Toolbox license
  • Creating access: users, clients, and projects
  • Updating access: users, clients, and projects
  • Deleting access: users, clients and projects
  • Reading-only access to the Toolbox and its projects

Teams

There are four teams that a user can be assigned to. In order from the most authority/more available actions to the least authority/least available actions, they are:

  1. The Executive team
  2. The Development team, the Design team, and the Customer Service team

Currently, the Executive team is the only team that will have all actions available to them in the Toolbox. Since the main purpose of having teams is simply to organize users and assist with project management (instead of barring users from accessing specific parts of the Toolbox), the other three teams all have the same level of access.

Keep in mind that A11y Toolbox users can utilize the various teams and corresponding actions however they see fit. User access/teams can consistently change based on the client project or stay the same – it’s up to you!

Actions/Access Available by Team

All teams/users have access to all of the individual tools within the Toolbox by default.

The main difference between the teams is that the Executive team can perform a few additional actions compared to the other three teams.

All Teams:

  • Have Reading access to all Toolbox tools.
  • Can Create/Update/Delete aspects of projects.

Executive Team members specifically can also:

  • Upgrade/Downgrade the A11y Toolbox license. (Executive Managers only)
  • Create/Update/Delete users across all teams (not just their own team).
  • Override tool access for all users and all teams (not just their own team).

As a general rule of thumb: You cannot edit the team or role of a user who has a higher level/the same level of access as yourself. The only exception to this is the Executive team, which has access to every action.

For example, a Standard user cannot edit a user with a Manager account, and a user on the Design team cannot edit the account of a user on the Executive team.

Roles

Within each team, there are also specific roles. Roles offer more specific access to projects within the parameters of the team they’re a member of. All four teams have the same roles available to them. Currently, there are two types of roles a team member can have.

In order from the most authority/more available actions to the least authority/least available actions, they are the:

  1. Manager role, and
  2. Standard role

**While the Client role is listed as an available role option, it is not currently implemented. This is a future update currently in the works**

Actions/Access Available by Roles

All Roles have Reading access to all tools within the Toolbox.

Managers can:

  • Update roles for users within their team.
  • Create/Delete users within their team.
  • Delete tools accessible to their team.
  • Create anything, i.e.: users, clients, projects, audits.
  • Update anything, i.e.: users, clients, projects, audits.
  • Delete anything, i.e.: users, clients, projects, audits.
  • Alter/add Success Criteria used within audits.

Standard users can:

  • Create/Update projects and audits using all tools accessible to their team. Standard users CANNOT create/update users or clients.
  • Delete parts of audits. Standard users CANNOT delete clients, users, or projects.